A Grey Afternoon, One Drawer, and a Paper-Scrap Collage
Make a paper-scrap collage with clean leftovers, a simple backing and a no-glue arranging stage that leaves room to change your mind.
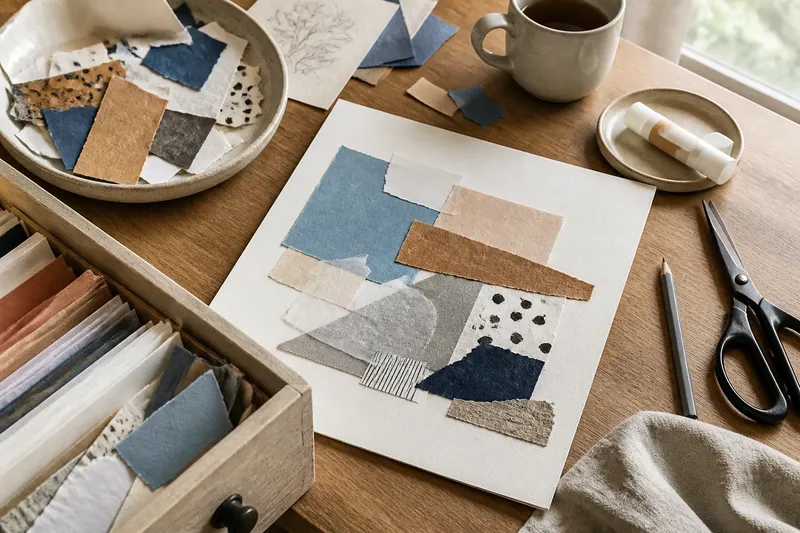
A grey afternoon, a clear patch of table and one drawer of paper scraps are enough to begin a paper-scrap collage. The useful part is not finding a grand subject; it is arranging the pieces before glue enters the discussion.
Collage suits the small, irregular leftovers that gather after wrapping, drawing or opening envelopes: a strip of coloured paper, the corner of a paper bag, a spare label with its writing removed. Start with what is clean and pleasant to handle, then give the pieces a temporary home on a backing surface. The arrangement can change as often as it needs to.
Choose paper for its feel as well as its colour
Paper scraps do not need to match, but they should be dry, clean and sound enough to move without disintegrating. Useful sources include envelopes, plain packaging, old drawings with an unused area, tissue paper and the margins left from cutting other projects. Avoid anything greasy, damp or coated in material that makes it awkward to glue.
Different papers behave differently. A stiff card gives a firm edge and holds its shape; thin paper can overlap without making a bulky ridge; tissue adds a softer, more translucent layer. These are not grades of quality. They are choices about the sort of surface and edge you want to see.
Keep scraps in a modest selection rather than emptying every drawer onto the table. A few colours, a couple of textures and some neutral paper are usually enough to start. Too much variety can turn the first decision into sorting, which is a fine activity but not quite the same afternoon.
Set up a backing that can stay flat
Choose a backing surface that will support the scraps and suit the finished piece: sturdy paper, thin card or a piece cut from clean packaging. A plain backing makes the shapes easier to read, while a coloured one can show through gaps and become part of the design. If the backing is already marked, decide whether those marks belong in the picture or are merely evidence of an earlier ambition.
Work on a surface that can tolerate stray adhesive, or place scrap paper beneath the backing. Keep scissors, a pencil and glue within reach, but leave the glue closed during the first arrangement. A small dish or shallow tray is useful for keeping the chosen pieces together; it need not be decorative, a role often assigned to objects that are now in the way.
If the backing curls or shifts, place a clean, flat weight on an unused edge while you arrange. A book can do the job, provided it does not cover the area you are working on. The aim is simply to keep the base from becoming another moving part.
Arrange first and let the design stay provisional
Begin by making a few loose shapes. Tear paper for irregular edges or cut it with scissors for a more deliberate outline. Try broad pieces before small details, since large areas establish the balance of the collage and make it easier to judge where the remaining scraps might go.
Set pieces on the backing without gluing them. Move one at a time, turn it around, overlap it or leave a gap. Look at the composition from a little farther back as well as close up: an arrangement that looks lively under your nose can become a dense patch when seen as a whole.
One useful way to organise the table is to keep three small groups: pieces you are considering, pieces currently in the arrangement and pieces you have decided not to use. The last group is not a verdict on the scraps. It is a way to stop every discarded option from returning to the centre of attention.
Say you have a broad blue envelope piece, a narrow strip of brown paper and several pale scraps. You might place the blue shape off-centre, lay the brown strip across one edge, then move it aside when it divides the space too neatly. The visible result is not a finished design but a clearer sense of what the remaining pieces need to do.
What makes a paper-scrap collage feel settled?
Should I cut or tear the paper?
Use cutting when you want a clean edge or a shape that needs to fit a particular space. Tear when a rough border would soften a hard outline or make two different papers sit together more gently.
How many colours should I use?
There is no fixed number; begin with a small group and add another colour only if the arrangement seems to need it. Repeating one colour in separate places can help the pieces feel related without making them identical.
Should the scraps overlap?
Overlap can create depth and hide awkward edges, while a narrow gap can let the backing show through. Try both before choosing; a gap is not automatically unfinished, and overlap is not automatically better.
What if I like several arrangements?
Keep the alternatives on the table and take a quick photograph of each with a phone, or sketch their positions on a spare sheet. Compare them after a short pause, when the most recent arrangement is no longer getting special treatment simply for being recent.
Commit to the arrangement in manageable passes
When the layout feels coherent, notice which pieces sit underneath others and which need to remain visible. Glue the lower layers first, then add the pieces that overlap them. If a piece is small or narrow, apply adhesive sparingly so it does not buckle or spread beyond the edge.
Use an adhesive intended for paper and follow its label and the backing or paper maker’s instructions where those apply. Keep the work area clear enough to set the collage down without dragging a sleeve through the wet parts. A clean scrap sheet can be used to press a piece gently in place without putting fingerprints across it.
Pause after securing the larger shapes. Small details often look tempting when the work is still open, but they can crowd a composition that already has enough movement. Add only what improves the relationship between the larger pieces: perhaps a short line, a small repeated shape or one patch of contrasting texture.
Leave room for an ending that is not a frame
A collage can be finished when the arrangement feels balanced, not when every corner is covered. Empty backing gives the eye somewhere to rest and can make the paper shapes more legible. If a bare area looks deliberate, let it be deliberate.
Once the adhesive has dried according to its instructions, the piece can be kept as it is, displayed, or used as a cover for a notebook or handmade card. Choose a use that suits the backing and the paper; a delicate surface may prefer a quiet place rather than daily handling.
For the next paper-scrap collage, save only the kinds of leftovers you actually enjoyed arranging: perhaps torn translucent paper, firm coloured card or broad pieces from envelopes. A small, selective drawer makes a grey afternoon easier to start, and leaves enough table for the work itself.